ps调出偏暗外景婚片甜美的蓝红色
- 2023-01-07 23:14:32
- 来源/作者:互联网/佚名
- 己被围观次
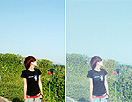
本教程介绍蓝色婚片的调色方法。过程也比较简单,调色之前先美化一下画面,如把图片调亮,人物部分磨皮处理。然后把背景部分调成灰色,并用调色工具重新调成蓝色主色,后期处理一下细节即可。 原图 点小图查看大图
本教程介绍蓝色婚片的调色方法。过程也比较简单,调色之前先美化一下画面,如把图片调亮,人物部分磨皮处理。然后把背景部分调成灰色,并用调色工具重新调成蓝色主色,后期处理一下细节即可。
原图
![[转载]Photoshop调出偏暗外景婚片甜美的蓝红色](https://fj.psjia.com/d/file/bigpic/2023/01/07/rd4tdddgl5n.jpg "[转载]Photoshop调出偏暗外景婚片甜美的蓝红色")
<点小图查看大图>
最终效果
![[转载]Photoshop调出偏暗外景婚片甜美的蓝红色](https://fj.psjia.com/d/file/bigpic/2023/01/07/ph3bfvzorhm.jpg "[转载]Photoshop调出偏暗外景婚片甜美的蓝红色")
<点小图查看大图> 1、打开原图素材,按Ctrl + J 把背景图层复制一层,图层混合模式改为“滤色”,不透明度改为:20%,效果如下图。
![[转载]Photoshop调出偏暗外景婚片甜美的蓝红色](https://fj.psjia.com/d/file/bigpic/2023/01/07/ftdmszw5lie.jpg "[转载]Photoshop调出偏暗外景婚片甜美的蓝红色")
<图1>
2、创建色彩平衡调整图层,对中间调及高光进行调整,参数设置如图2,3,效果如图4。
![[转载]Photoshop调出偏暗外景婚片甜美的蓝红色](https://fj.psjia.com/d/file/bigpic/2023/01/07/ee0vkgmqccc.jpg "[转载]Photoshop调出偏暗外景婚片甜美的蓝红色")
<图2>
![[转载]Photoshop调出偏暗外景婚片甜美的蓝红色](https://fj.psjia.com/d/file/bigpic/2023/01/07/ngyty3og5dx.jpg "[转载]Photoshop调出偏暗外景婚片甜美的蓝红色")
<图3>
![[转载]Photoshop调出偏暗外景婚片甜美的蓝红色](https://fj.psjia.com/d/file/bigpic/2023/01/07/fcmrta4nvh2.jpg "[转载]Photoshop调出偏暗外景婚片甜美的蓝红色")
<图4> 3、创建可选颜色调整图层,对红,黄,白进行调整,参数设置如图5 - 7,效果如图8。
![[转载]Photoshop调出偏暗外景婚片甜美的蓝红色](https://fj.psjia.com/d/file/bigpic/2023/01/07/1baf5zy513z.jpg "[转载]Photoshop调出偏暗外景婚片甜美的蓝红色")
<图5>
![[转载]Photoshop调出偏暗外景婚片甜美的蓝红色](https://fj.psjia.com/d/file/bigpic/2023/01/07/02dfzcmhhmh.jpg "[转载]Photoshop调出偏暗外景婚片甜美的蓝红色")
<图6>
![[转载]Photoshop调出偏暗外景婚片甜美的蓝红色](https://fj.psjia.com/d/file/bigpic/2023/01/07/zrilb0e2fxh.jpg "[转载]Photoshop调出偏暗外景婚片甜美的蓝红色")
<图7>
![[转载]Photoshop调出偏暗外景婚片甜美的蓝红色](https://fj.psjia.com/d/file/bigpic/2023/01/07/hqo5oliqruf.jpg "[转载]Photoshop调出偏暗外景婚片甜美的蓝红色")
<图8> 4、按Ctrl + J 把当前可选颜色调整图层复制一层,不透明度改为:50%,效果如下图。
![[转载]Photoshop调出偏暗外景婚片甜美的蓝红色](https://fj.psjia.com/d/file/bigpic/2023/01/07/hs4jfy1oq0l.jpg "[转载]Photoshop调出偏暗外景婚片甜美的蓝红色")
<图9>
5、创建色相/饱和度调整图层,选择绿色,用吸管吸取背景绿色部分再调整,参数设置如图10,效果如图11。
![[转载]Photoshop调出偏暗外景婚片甜美的蓝红色](https://fj.psjia.com/d/file/bigpic/2023/01/07/wa40qpthtcu.jpg "[转载]Photoshop调出偏暗外景婚片甜美的蓝红色")
<图10>
![[转载]Photoshop调出偏暗外景婚片甜美的蓝红色](https://fj.psjia.com/d/file/bigpic/2023/01/07/u5xuroyazap.jpg "[转载]Photoshop调出偏暗外景婚片甜美的蓝红色")
<图11> 6、创建曲线调整图层,对蓝色进行调整,参数设置如图12,效果如图13。
![[转载]Photoshop调出偏暗外景婚片甜美的蓝红色](https://fj.psjia.com/d/file/bigpic/2023/01/07/lqcl0zmt3bu.jpg "[转载]Photoshop调出偏暗外景婚片甜美的蓝红色")
<图12>
![[转载]Photoshop调出偏暗外景婚片甜美的蓝红色](https://fj.psjia.com/d/file/bigpic/2023/01/07/wnempxfok3u.jpg "[转载]Photoshop调出偏暗外景婚片甜美的蓝红色")
<图13>
7、创建曲线调整图层,对红,蓝进行调整,参数设置如图14,15,效果如图16。
![[转载]Photoshop调出偏暗外景婚片甜美的蓝红色](https://fj.psjia.com/d/file/bigpic/2023/01/07/m1iht3z1m5v.jpg "[转载]Photoshop调出偏暗外景婚片甜美的蓝红色")
<图14>
![[转载]Photoshop调出偏暗外景婚片甜美的蓝红色](https://fj.psjia.com/d/file/bigpic/2023/01/07/yo0aso2bxi4.jpg "[转载]Photoshop调出偏暗外景婚片甜美的蓝红色")
<图15>
![[转载]Photoshop调出偏暗外景婚片甜美的蓝红色](https://fj.psjia.com/d/file/bigpic/2023/01/07/3fowwkvgr5z.jpg "[转载]Photoshop调出偏暗外景婚片甜美的蓝红色")
<图16> 8、新建一个图层,按Ctrl + Alt + Shift + E 盖印图层。简单的给人物磨一下,方法任选,大致效果如下图。
![[转载]Photoshop调出偏暗外景婚片甜美的蓝红色](https://fj.psjia.com/d/file/bigpic/2023/01/07/ffp51qdnsvt.jpg "[转载]Photoshop调出偏暗外景婚片甜美的蓝红色")
<图17>
9、创建可选颜色调整图层,对红、黄、蓝、白进行调整,参数设置如图18 - 21,效果如图22。
![[转载]Photoshop调出偏暗外景婚片甜美的蓝红色](https://fj.psjia.com/d/file/bigpic/2023/01/07/ny55opfujec.jpg "[转载]Photoshop调出偏暗外景婚片甜美的蓝红色")
<图18>
![[转载]Photoshop调出偏暗外景婚片甜美的蓝红色](https://fj.psjia.com/d/file/bigpic/2023/01/07/w5jwu4cjeip.jpg "[转载]Photoshop调出偏暗外景婚片甜美的蓝红色")
<图19>
![[转载]Photoshop调出偏暗外景婚片甜美的蓝红色](https://fj.psjia.com/d/file/bigpic/2023/01/07/skwvyjymbpu.jpg "[转载]Photoshop调出偏暗外景婚片甜美的蓝红色")
<图20>
![[转载]Photoshop调出偏暗外景婚片甜美的蓝红色](https://fj.psjia.com/d/file/bigpic/2023/01/07/tc05vclcay3.jpg "[转载]Photoshop调出偏暗外景婚片甜美的蓝红色")
<图21>
![[转载]Photoshop调出偏暗外景婚片甜美的蓝红色](https://fj.psjia.com/d/file/bigpic/2023/01/07/3djjcvno0nf.jpg "[转载]Photoshop调出偏暗外景婚片甜美的蓝红色")
<图22> 10、新建一个图层,盖印图层。执行:滤镜 > 模糊 > 动感模糊,参数设置如图23,确定后把图层混合模式改为“柔光”,不透明度改为:60%,效果如图24。
![[转载]Photoshop调出偏暗外景婚片甜美的蓝红色](https://fj.psjia.com/d/file/bigpic/2023/01/07/cxzkzttr2ef.jpg "[转载]Photoshop调出偏暗外景婚片甜美的蓝红色")
<图23>
![[转载]Photoshop调出偏暗外景婚片甜美的蓝红色](https://fj.psjia.com/d/file/bigpic/2023/01/07/vn2edxxr0bc.jpg "[转载]Photoshop调出偏暗外景婚片甜美的蓝红色")
<图24>
11、创建色彩平衡调整图层,对中间调进行调整,参数设置如图25,确定后用黑色画笔把人物脸部及肤色部分擦出来,效果如图26。
![[转载]Photoshop调出偏暗外景婚片甜美的蓝红色](https://fj.psjia.com/d/file/bigpic/2023/01/07/amhtulbruep.jpg "[转载]Photoshop调出偏暗外景婚片甜美的蓝红色")
<图25>
![[转载]Photoshop调出偏暗外景婚片甜美的蓝红色](https://fj.psjia.com/d/file/bigpic/2023/01/07/rylmefjeaur.jpg "[转载]Photoshop调出偏暗外景婚片甜美的蓝红色")
<图26> 12、创建曲线调整图层,对红,蓝进行调整,参数设置如图27,确定后只保留人物肤色部分,其它部分用黑色画笔擦掉,图层不透明度改为:30%,效果如图28。
![[转载]Photoshop调出偏暗外景婚片甜美的蓝红色](https://fj.psjia.com/d/file/bigpic/2023/01/07/rs2mumdjefo.jpg "[转载]Photoshop调出偏暗外景婚片甜美的蓝红色")
<图27>
![[转载]Photoshop调出偏暗外景婚片甜美的蓝红色](https://fj.psjia.com/d/file/bigpic/2023/01/07/ams3unvxzwm.jpg "[转载]Photoshop调出偏暗外景婚片甜美的蓝红色")
<图28>
13、新建一个图层,简单给图片加上暗角,大致效果如下图。
![[转载]Photoshop调出偏暗外景婚片甜美的蓝红色](https://fj.psjia.com/d/file/bigpic/2023/01/07/1zqqaqsnnpw.jpg "[转载]Photoshop调出偏暗外景婚片甜美的蓝红色")
<图29> 14、创建色彩平衡调整图层,对中间及高光进行调整,参数设置如图30,31,确定后只保留人物肤色部分,其它部分用黑色画笔擦掉,图层不透明度改为:50%,效果如图32。
![[转载]Photoshop调出偏暗外景婚片甜美的蓝红色](https://fj.psjia.com/d/file/bigpic/2023/01/07/zcrdle05n1i.jpg "[转载]Photoshop调出偏暗外景婚片甜美的蓝红色")
<图30>
![[转载]Photoshop调出偏暗外景婚片甜美的蓝红色](https://fj.psjia.com/d/file/bigpic/2023/01/07/vbig40g334x.jpg "[转载]Photoshop调出偏暗外景婚片甜美的蓝红色")
<图31>
![[转载]Photoshop调出偏暗外景婚片甜美的蓝红色](https://fj.psjia.com/d/file/bigpic/2023/01/07/d4f2gkkzare.jpg "[转载]Photoshop调出偏暗外景婚片甜美的蓝红色")
<图32> 15、创建曲线调整图层,对红,蓝进行调整,参数设置如图33,效果如图34。
![[转载]Photoshop调出偏暗外景婚片甜美的蓝红色](https://fj.psjia.com/d/file/bigpic/2023/01/07/3zircu4fr0l.jpg "[转载]Photoshop调出偏暗外景婚片甜美的蓝红色")
<图33>
![[转载]Photoshop调出偏暗外景婚片甜美的蓝红色](https://fj.psjia.com/d/file/bigpic/2023/01/07/ydbpnrstpsn.jpg "[转载]Photoshop调出偏暗外景婚片甜美的蓝红色")
<图34>
最后把图片适当柔化处理,完成最终效果。
<点小图查看大图>
*PSjia.COM 倾力出品,转载请注明来自PS家园网(www.psjia.com)
更多精彩内容
-
 调出日系青春的可爱外景小美女
 -
 PS中曲线的运用详细教程
 -
 简单调整树叶颜色:绿变红
 -
 村长调色教程数十例
 -
 分析色调的定位教程详解
 -
 跟着大师学调湛蓝色调时装片
 -
 PS调出流行的日系小清新色调
 -
 用PS修出梦幻风格雪景摄影大片