PS制作质感的金属立体字
- 2021-05-21 21:07:58
- 来源/作者:互联网/佚名
- 己被围观次
本教程主要使用Photoshop制作质感的金属立体字。下面一起来学习吧。
Step 12
We will add an outer glow effect to this soft masked text in order to simulate the light sparkle that passes through the badge.
对刚才的蒙版文字图层添加以下图层样式。

Step 13
To finish the work we will add a Lens Flare in the edge of the badge. I usually create these effects with a KPT plug-in for Photoshop but I share a download link of a .PNG with a pack of flares of my own collection.
需要给徽章的边缘加上一些镜头光晕,作者在这里分享了他创建的png图片,可以直接使用。

Step 14
Choose a lens flare FX from the .PNG and copy- paste it into our .PSD file. Edit its size and place it in the left side of the badge, matching it with the passing light Y position.
最后把镜头光晕调整到合适的位置并缩放到合适的尺寸。

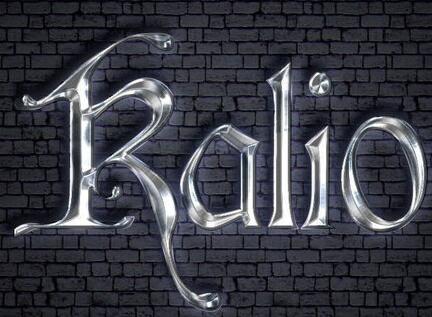
Conclusion
You could try with a logo or other fonts. Don’t forget to join the letters or shapes of your work in order to give more realism to your badge. You can view the final image below. Good luck!
最终效果如下。

(责任编辑:极限)
*PSjia.COM 倾力出品,转载请注明来自PS家园网(www.psjia.com)
上一篇:PS制作金属质感文字效果
下一篇:PS制作梦幻的蓝色浮雕字教程
更多精彩内容
-
 PS创意字体效果制作:水与火之“S”
 -
 PHOTOSHOP制作金属质感文字效果教程
 -
 淘宝美工常用的字体大全
 -
 ps 制作投影的3D立体文字
 -
 Photoshop制作蓝紫色渐变的3D立体文字
 -
 详细解析中文字体设计的创意造字法
 -
 PS立体字新手入门教程
 -
 字体设计、排版窍门